
By Daria Huxley
Many commercial photographers working with brands and companies often need to take a picture of a white object, be it a piece of clothing, as accessory or tableware, — against white background. This is a standard practice that requires photographers to deliver photos ready-to-publish, specifically for company catalogs or websites.
In this tutorial I explain the lighting schemes and editing practices that will help you achieve best looking results.
Part 1. Shooting the White Object against White Background
First of all, you will need a shooting table where you can place your items, and two light sources, preferably with large soft boxes. Soft boxes are especially great since they create a nice looking soft shadow, which is ideal for creating some contrast between the item and the background.
You can use the lighting scheme presented in the image below.

Sample lighting scheme I use for small-sized product photography.
Place your camera on a tripod and photograph your item from a couple of different angles so you have variety. I typically set the ISO at 100 and have the aperture at 4.0, but this may vary depending on your subject.
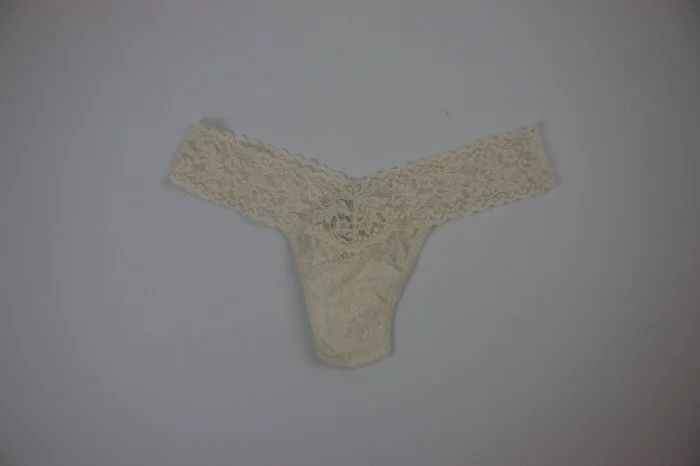
For this tutorial I am going to be using an example of the lingerie piece I photographed for one of my clients. Original photo would look somewhat like the photo I had taken below.
Original photo of a white item on white background. ©2017 Daria Huxley
After you are done taking photos of all objects you need and you made sure you got all objects from a couple different angles, it is time to edit the photos to achieve the desired look.
Part 2. Editing Photos of White Objects against White Background
The most important part here is to make sure the whites appear as whites on any screen as well as in print. For that reason we have to pay close attention to white balance.
Original photo of a white item on white background. ©2017 Daria Huxley
I do the main editing of my photos in Photoshop, but before that I do batch processing in Lightroom. In Lightroom you can make exposure correction and correct the basic white balance. See the intermediary result after editing the photo in Lightroom below.

Photo of a white item on white background with basic exposure and white balance adjustments in Lightroom. ©2017 Daria Huxley
After you made the basic corrections it’s time for the heavy Photoshop work. Note: you could do the basic retouching in Photoshop right away, skipping the previous step. I just prefer it that way because it fastens my workflow.
Now that we have our image in Photoshop, create a duplicate layer for the main image. We always want to have a “safety” layer, just in case we ever need to return to the imported original.

Basic layer structure for editing product shots in Photoshop.
After copying the layer, apply Levels adjustment layer. Use white color picker on the background — the program will automatically calculate the best exposure for your main white. Make sure you navigate a couple different places before picking up the best one. Also, make sure your object appears well lit and no details are lost in highlights.
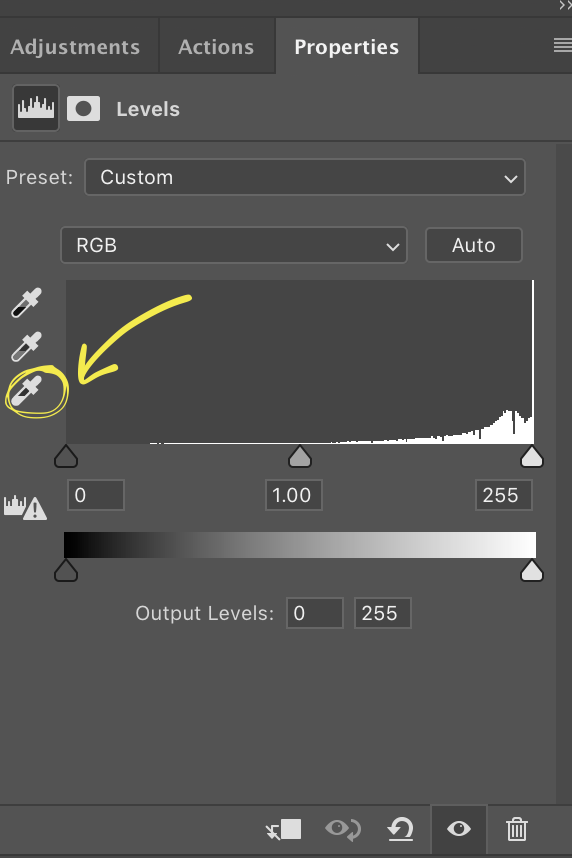
Exposure correction via setting a white point through Levels adjustment layer.
After setting the levels we can now start working on the background. For this purpose create a mask of your secondary layer. Create a perfectly white layer just below the masked one — you have your ideal background hidden for now. Use Wand Tool to select the whites on the main layer, select the mask and then mask away the whites.

Photo of a white item on white background with levels adjustment layer applied and with cleaned background. ©2017 Daria Huxley
Here is what the image looks like with Levels adjustment layer applied and background removed. Now it’s time to do the shadow work, which is the most time-consuming part of the entire process.
Once again, select the mask and start working away with the large soft brush at about 15% transparency. Change the size of it according to the exact area you are working. In the end you get the result which looks approximately like this.

Final ready-to-use catalog photo of a white item on white background. ©2017 Daria Huxley
This process can be applied to any white or light object that needs to be photographed against the white background.
I hope you found this tutorial useful, and good luck to all of you in your work!