
By Totemworlds
I’m Totemworlds, a DIY-filmmaker and composer. My latest short film features some of the most fantastical shots I have ever designed. Here’s how I transformed my dull (and at times problematic) footage into something special, and how you can use Photo-editing software to drastically improve your shots.
When you’re working with average computers, video editing and rendering can be a tedious process. As a DIY-filmmaker I’ve learned that working in Photo-editing software (Photoshop or Pixelmator, etc) allows me to edit fine details in my shots more efficiently. It’s also a more affordable option if you can’t afford a set designer, special effects, or the perfect location.
Here’s a before and after to show you what is possible:
Before / Photo by Totemworlds

After (Click Here) / Photo by Totemworlds
Method:
1 Plan your shots
This technique comes with its own set of limitations. First, your shot must be completely still. During shooting, no moving objects can cross the area you’ll be editing. Notice how in the shot above, the moving subject is not crossing any of the areas inside the rectangles?
Fortunately, with a well planned shot you can fool your audience into thinking your subject is in a fantastical setting, doing a Yoga pose your average Joe can’t handle. Plan your shots accordingly to create convincing transformations, and use your creativity to turn these limitations into advantages.
2 Import a single frame of your shot into your Photo-editing software and Edit.
To make this shot look convincing, I had to first remove the ugly background. The goal was to make the viewer believe this was shot at a laboratory in the middle of the jungle.
Step one was during production. Again, it was crucial to plan the shot carefully so that it would be easy to get rid of the background by keeping it perfectly still and not having any objects crossing the area I was going to edit.
Photo by Totemworlds
Step two was in post-production. I took a screenshot and imported it into Pixelmator. To take a screenshot on a Mac press Command-Shift-4 on your keyboard. If you are working on a PC, here are two ways to take a screenshot.
Once in Pixelmator, I deleted the background by selecting in with the Lasso Tool and the Magic Wand Tool. To blend the transparent egg carton in the center of the screenshot, I used the Repair Tool (this handy tool allows you to fix image imperfections such as scratches, blemishes, etc).

Photo by Totemworlds
Then, to simulate the transparency of the egg carton, I used Brush Tool with the opacity set to 30%.
Photo by Totemworlds
Tip: Remember to take your screenshots in full-screen to preserve quality.
3 Export your file as PNG
In this technique, always export as PNG because that way we preserve the transparent areas (marked by tiny white and gray squares). A PNG file is much larger than the common photo file we know as JPEG, but it allows much more flexibility.
4 Import your PNG file into your Video Editing Software
Import your PNG file into your Video-editing software of choice, the program will allow images or video to reproduce within the transparent areas. Generally, the option to import is found in the Menu Bar under File.
Since I did all the retouching work previously in Pixelmator I was ready to fill the transparent area with an appropriate background. I imported a photo that is both visually striking and matched the kind of lighting of the original shot. With the background layered behind the edited screenshot, the shot started to look like it was filmed in the middle of the jungle!

Photo by Totemworlds
5 Use effects for greater realism
Some useful effects to better blend both layers include Camera shake (to decrease dullness from having a still shot), Noise Grain (to blend everything together), Glow (to simulate lighting coming from the windows in this case) and even adding Flare or moving particles like dust to add more realism.
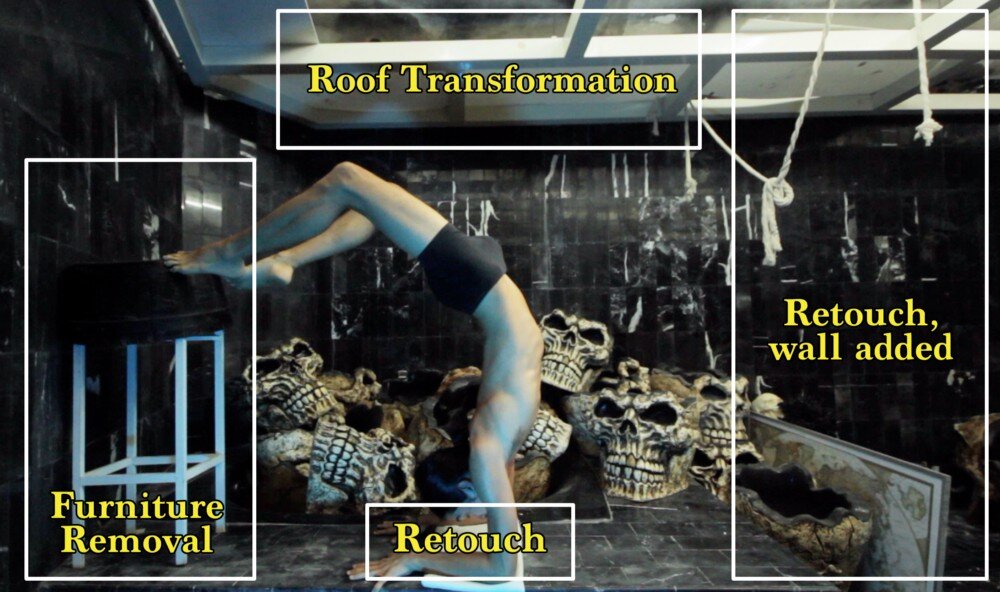
“Scorpion Pose” Case Study:
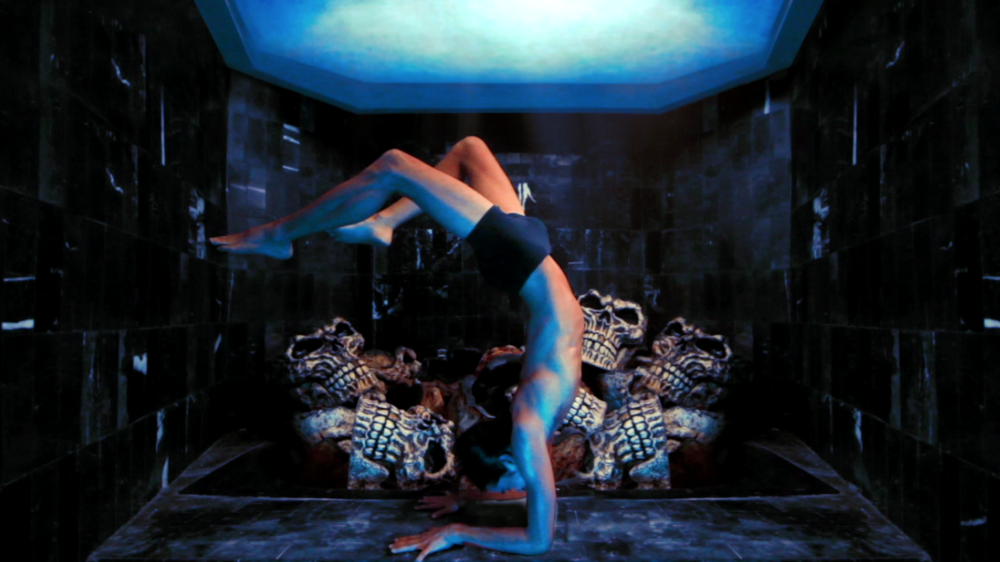
Photo by Totemworlds
For this shot I used multiple sets of tools in Pixelmator to fix issues, retouch, and make the shot look more appealing. First I used the Repair tool and Copy-Paste to remove the table my foot was resting on. Then, I selected the entire left wall, flipped it horizontally, and pasted it onto the right side to make the shot more symmetric.
Tip: Use a soft eraser with 0% hardness to smooth out the edges of your selections.
It was necessary to remove the white towel on the floor (thankfully my subject didn’t cross that area) so I used a combination of the Repair Tool and the Clone Stamp tool for this, using the texture of the floor around my subject as reference.
Finally I added some effects: water refraction on the roof, a slight glare coming from above, some grain noise, and color correction for a dramatic effect! To see the finished result, find this shot between 19:08–19:11 of the film.
Working with Photo-editing software instead of video was a smoother experience which allowed me to be more precise with my retouching. I hope these techniques will encourage you to tweak and enhance your existing shots and make them more special.